프로세스와 쓰레드
CPU 코어에서 돌아가는 프로그램 단위를 쓰레드(Thread) 라고 부른다. 즉, CPU 의 코어 하나에서는 한 번에 한 개의 쓰레드의 명령을 실행시키게 된다.
프로세스는 여러 개의 쓰레드로 이루어지는데, 프로세스와 쓰레드의 차이는 메모리를 공유하느냐 하지 않느냐의 차이이다.
각 코어에서는 코어가 돌아가는데, 컨텍스트 스위칭 (Context Switching) 을 통해 쓰레드가 번갈아가며 실행된다.

병렬화(Parallelizable) 가능한 작업
쓰레드를 이용해 병렬화를 적용하면 더욱 빠른 작업이 가능한 경우가 있다.
예를 들어, 다음과 같이 피보나치 수열을 구하는 프로그램이 있다고 가정해 보자.
#include <iostream>

int main() {

	int bef = 1, cur = 1;

	for (int i = 0; i < 98; ++i) {
		int temp = cur;
		cur = cur + bef;
		bef = temp;
	}

	std::cout << "F100 : " << cur << std::endl;
}
이런 경우, 피보나치 수열에서 F(N) 을 구하기 위해선 F(N-1) 과 F(N-2) 의 값을 먼저 구해야 한다. 이처럼, 어떠한 연산 (연산 A) 을 수행하기 위해 다른 연산 (연산 B) 의 결과가 필요한 상황을 A 가 B 에 의존(dependent) 한다고 한다. 따라서 연산들이 서로 독립적일 수록 병렬화가 쉬워진다.
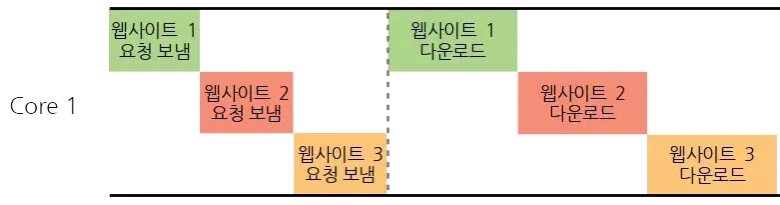
다음과 같이 인터넷에서 웹사이트를 긁어 모으는 프로그램을 생각해 보자.
using namespace std;
int main() {

	// 다운받으려는 웹사이트와 내용을 저장하는 맵
	map<string, string> url_and_content;
	for (auto itr = url_and_content.begin(); itr != url_and_content.end(); ++itr) {
		const string& url = itr->first;

		// download 함수는 인자로 전달받은 url 에 있는 사이트를 다운받아 리턴한다.
		itr->second = download(url);
	}
}
인터넷은 CPU 처리 속도에 비해 느리고, 웹사이트 내용을 다운 받는 작업은 서로 독립적이므로, 쓰레드 여러 개를 사용해서 다음과 같이 CPU 를 효율적으로 사용하도록 만들 수 있다.
C++ 에서 쓰레드 생성
C++ 11 부터 표준에 쓰레드가 추가되었다.
#include <iostream>
#include <thread>
using std::thread;
void func1() {
for (int i = 0; i < 10; ++i) {
std::cout << "쓰레드 1 작동중! \n";
}
}
void func2() {
for (int i = 0; i < 10; ++i) {
std::cout << "쓰레드 2 작동중! \n";
}
}
void func3() {
for (int i = 0; i < 10; ++i) {
std::cout << "쓰레드 3 작동중! \n";
}
}
int main() {
thread t1(func1);
thread t2(func2);
thread t3(func3);
t1.join();
t2.join();
t3.join();
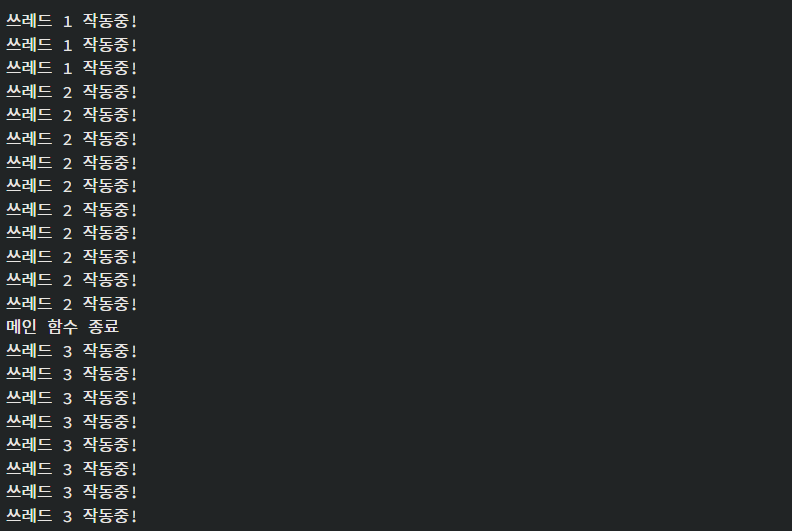
}먼저 함수를 이용해 쓰레드 객체를 생성하고, join 을 통해 해당 쓰레드가 실행을 종료하면 리턴하도록 만들었다.
다음과 같은 코드를 실행시키면 운영체제에 따라 3개의 코어에 쓰레드가 할당될 수도 있고, 하나의 코어에 할당되어 컨텍스트 스위칭이 일어날 수도 있다. 어찌되었든, 3 개의 쓰레드가 호출되는 순서는 실행할 때마다 계속 달라질 수 있다.
만약에 join 을 하지 않는다면 어떻게 될까?

위처럼, 쓰레드들의 내용이 실행 완료되기 전에 main 함수가 종료되어 쓰레드 객체들 (t1, t2, t3) 의 소멸자가 호출된 것이다. C++ 표준에 의하면, join 되거나 detach 되지 않는 쓰레드들의 소멸자가 호출된다면 예외를 발생시키도록 명시되어 있다.
detach 는, 말 그대로 해당 쓰레드를 실행시킨 후, 잊어버리는 것(알아서 백 그라운드에서 돌아가게 되는 것) 이다.
t1.detach();
t2.detach();
t3.detach();

std::cout << "메인 함수 종료!\n";
다음을 추가하면,

또는
와 같이 여러 결과가 나온다.
기본적으로 프로세스가 종료될 때, 해당 프로세스 안에 있는 모든 쓰레드들은 종료 여부와 상관없이 자동으로 종료된다. 즉, main 함수에서 메인 함수 종료! 를 출력하고, 프로세스가 종료하게 되면, func1, func2, func3 모두 더 이상 쓰레드 작동중! 을 출력할 수 없게 된다.
쓰레드에 인자 전달하기
include <cstdio>
#include <iostream>
#include <thread>
#include <vector>
using std::thread;
using std::vector;

void worker(vector<int>::iterator start, vector<int>::iterator end, int* result) {
  int sum = 0;
  for (auto itr = start; itr < end; ++itr)
    sum += *itr;
  *result = sum;

  // Get ID of threads
  thread::id this_id = std::this_thread::get_id();
  printf("From Thread %x, %d to %d : %d \n", this_id, *start, *(end-1), sum);
}

int main() {
  vector<int> data(10000);
  for (int i = 0; i < 10000; ++i) {
    data[i] = i;
  }

  // Store partial sum for each thread
  vector<int> partial_sums(4);

  vector<thread> workers;
  for (int i = 0; i < 4; ++i) {
    workers.push_back(thread(worker, data.begin() + i * 2500, data.begin() + (i+1) * 2500, &partial_sums[i] ));
  }

  for (int i = 0; i < 4; ++i)
    workers[i].join();

  int total = 0;
  for (int i = 0; i < 4; ++i)
    total += partial_sums[i];

  std::cout << "Total Sum : " << total << std::endl;
}
위의 코드를 보면, worker 라는, 범위값을 더해주는 함수를 만들고, workers 벡터에 thread 가 연산을 하도록 만들어 주고 있음을 알 수 있다.
결과물은 다음과 같다.
From Thread 2, 0 to 2499 : 3123750
From Thread 3, 2500 to 4999 : 9373750
From Thread 4, 5000 to 7499 : 15623750
From Thread 5, 7500 to 9999 : 21873750
Total Sum : 49995000
그런데 worker 함수에서, printf 대신 std::cout 을 쓰게되면 다음과 같은 결과가 나올 수 있다.
쓰레드 쓰레드 쓰레드 쓰레드 7f2d6ea5c700 에서 7f2d6f25d700 에서 7f2d6fa5e70075005000 에서  부터  부터 2500 부터 4999 까지 계산한 결과 : 93737509999 까지 계산한 결과 : 218737507499 까지 계산한 결과 : 156237507f2d7025f700 에서
0 부터 2499 까지 계산한 결과 : 3123750
이러한 결과가 나오는 이유는, std::cout 이 << 를 실행하는 과정 중간 중간에 다른 쓰레드들의 동작이 끼어들 수 있기 때문이다. 즉, std::cout << A; 의 경우, A 가 출력되는 도중에 다른 쓰레드가 내용을 출력할 수 없게 보장을 해 준다(컨텍스트 스위치가 되더라도). 하지만 std::cout << A << B; 의 경우에는 A를 출력한 이후 B를 출력하기 전에 다른 쓰레드가 내용을 출력할 수 있다.
반면, printf 의 경우는 문자열을 출력할 때 컨텍스트 스위치가 일어나도 다른 쓰레드들이 그 사이에 메시지를 넣을 수 없게 막는다.
그런데, 만약 다른 쓰레드들이 같은 메모리에 서로 접근하고 데이터를 쓴다면 어떤 일이 발생할까? 다음 포스팅에서는 임계 영역(Critical Section), 뮤텍스(Mutex), 데드락(DeadLock) 등에 대해 다루고자 한다.
보너스 : 피보나치 수열을 쓰레드를 이용해 구하기
다음과 같은 코드를 통해 효율을 비교하였다 : 싱글 쓰레드에서 피보나치 수열을 구하기 vs f(x-1), f(x-2) 각각을 별도의 쓰레드에서 계산 후 합치기
include <iostream>
#include <cstdio>
#include <thread>
#include <vector>
#include <time.h>
using std::thread;
using std::vector;

typedef long long LL;

LL fibo_recur(int x) {

	if (x <= 2)
		return 1;

	LL	res = fibo_recur(x-1) + fibo_recur(x-2);
	return res;
}

LL fibo_recur2(int x, LL* result) {

	if (x <= 2) {
		*result = 1;
		return 1;
	}

	*result = fibo_recur(x-1) + fibo_recur(x-2);
	return *result;
}

int main() {

	// clock_t start, end;
	time_t start, end;
	int x;
	LL result;

	x = 50;

	// single thread
	start = clock();

	result = fibo_recur(x);

	end = clock();

	std::cout << "Result of fibo in single thread (" << x << ") : " << result << " / Time elapsed : " <<  (double)(end - start) << std::endl;


	// multi thread
	LL res1, res2;
	start = clock();

	thread f1(fibo_recur2, x-2, &res1);
	thread f2(fibo_recur2, x-1, &res2);
	f1.join();
	f2.join();
	result = res1 + res2;

	end = clock();


	std::cout << "Result of fibo in multi thread (" << x << ") : " << result << " / Time elapsed : " <<  (double)(end - start) << std::endl;
}
50번째 피보나치 수열을 구한다고 했을 때, 싱글 쓰레드와 멀티 쓰레드는 다음과 같은 성능 차이를 보인다 :
Result of fibo in single thread (50) : 12586269025 / Time elapsed : 46.883s
Result of fibo in multi thread (50) : 12586269025 / Time elapsed : 30.708s
만약 코드를 조금 바꿔서, 멀티 쓰레드를 사용할 경우, 재귀적으로 쓰레드를 생성한다면 어떻게 될까? 즉, 다음과 같은 식의 함수를 돌려보자.
LL fibo_multi(int x, LL* result) {
	if (x <= 2) {
		*result = 1;
		return 1;
	}
	LL res1, res2;
	thread f1(fibo_multi, x-1, &res1);
	thread f2(fibo_multi, x-2, &res2);
	f1.join();
	f2.join();

	*result = res1 + res2;
	return *result;
}
3 가지의 방식의 코드는 각각 다음과 같은 결과를 보인다(50번째 수열에 대해)
Result of fibo in single thread (50) : 12586269025 / Time elapsed : 40.725s
Result of fibo in multi thread (50) : 12586269025 / Time elapsed : 26.319s
Result of fibo in recursive multi thread (50) : 12586269025 / Time elapsed : 26.201s
51번째 수열에 대해서는, 오히려 재귀적으로 쓰레드를 만드는 방식이 더 비효율 적임을 알 수 있다.
Result of fibo in single thread (51) : 20365011074 / Time elapsed : 69.107s
Result of fibo in multi thread (51) : 20365011074 / Time elapsed : 44.808s
Result of fibo in recursive multi thread (51) : 20365011074 / Time elapsed : 45.641s
Race Condition
서로 다른 쓰레드에서 같은 메모리를 공유할 때 발생하는 문제를 경쟁 상태(race condition) 이라고 부른다.
다음 코드를 보자.
#include <iostream>
#include <thread>
#include <vector>

void worker(int& counter) {
  for (int i = 0; i < 10000; i++) {
    counter += 1;
  }
}

int main() {
  int counter = 0;

  std::vector<std::thread> workers;
  for (int i = 0; i < 4; i++) {
    // 레퍼런스로 전달하려면 ref 함수로 감싸야 한다 (지난 강좌 bind 함수 참조)
    workers.push_back(std::thread(worker, std::ref(counter)));
  }

  for (int i = 0; i < 4; i++) {
    workers[i].join();
  }

  std::cout << "Counter 최종 값 : " << counter << std::endl;
}
사실 우리가 짠 코드는 어셈블리어로 번역되어 순차적으로 실행되는데, 멀티 쓰레드일 경우 래지스터에 값을 저장하거나 연산을 수행할때 이 순서가 뒤죽박죽이 될 수 있다. 따라서, 위의 코드의 counter 는 40000 이 아닌 이상한 값이 나오게 된다.
뮤텍스(Mutex)
위와 같은 문제를 해결하기 위해, 뮤텍스(Mutex)를 활용할 수 있다.
#include <iostream>
#include <mutex>  // mutex 를 사용하기 위해 필요
#include <thread>
#include <vector>

void worker(int& result, std::mutex& m) {
  for (int i = 0; i < 10000; i++) {
    m.lock();
    result += 1;
    m.unlock();
  }
}

int main() {
  int counter = 0;
  std::mutex m;  // 우리의 mutex 객체

  std::vector<std::thread> workers;
  for (int i = 0; i < 4; i++) {
    workers.push_back(std::thread(worker, std::ref(counter), std::ref(m)));
  }

  for (int i = 0; i < 4; i++) {
    workers[i].join();
  }

  std::cout << "Counter 최종 값 : " << counter << std::endl;
}
뮤텍스를 사용하면 특정 쓰레드가 뮤텍스를 가지고 있을 때 다른 쓰레드가 뮤텍스를 얻기 전까지는 해당 영역의 코드를 실행할 수 없게 된다.
그 특정 영역을 임계 영역(Critical Section) 이라고 한다.
// 임계 영역(Critical Section)
m.lock();
result += 1;
m.unlock();
만약 mutex 를 unlock 하지 않으면 어떻게 될까?
만일 mutex 의 해제가 제대로 이루어지지 않으면, 데드락(DeadLock) 문제가 발생한다. 이를 방지하기 위해, 이전에 배운 unique_ptr 를 이용해 소멸자에서 메모리를 해제하도록 만들 수 있다.
#include <iostream>
#include <mutex>
#include <thread>
#include <vector>

void worker(int& result, std::mutex& m) {
	for (int i = 0; i < 10000; ++i) {
		// When lock is created, m.lock() is called
		std::lock_guard<std::mutex> lock(m);
		result += 1;

		// lock vanishes as escaping the scope
		// unlock m by itself;
	}
}

int main() {

	int counter = 0;
	std::mutex m;

	std::vector<std::thread> workers;
	for (int i = 0; i < 4; ++i) {
		workers.push_back(std::thread(worker, std::ref(counter), std::ref(m)));
	}

	for (int i = 0; i < 4; ++i) {
		workers[i].join();
	}

	std::cout << "Counter Value : " << counter << std::endl;
}
lock_guard 객체는 뮤텍스를 인자로 받아 생성자에서 뮤텍스를 lock 한다. 그 후 lock_guard 가 소멸될 때 알아서 lock 했던 뮤텍스를 unlock 해주게 된다.
데드락 (deadlock)
하지만 unique_ptr 를 활용해도 데드락 상황은 얼마든지 생길 수 있다.
다음과 같은 코드는 절대 스스로 종료하지 않는다.
#include <iostream>
#include <mutex>  // mutex 를 사용하기 위해 필요
#include <thread>

void worker1(std::mutex& m1, std::mutex& m2) {
  for (int i = 0; i < 10000; i++) {
    std::lock_guard<std::mutex> lock1(m1);
    std::lock_guard<std::mutex> lock2(m2);
    // Do something
  }
}

void worker2(std::mutex& m1, std::mutex& m2) {
  for (int i = 0; i < 10000; i++) {
    std::lock_guard<std::mutex> lock2(m2);
    std::lock_guard<std::mutex> lock1(m1);
    // Do something
  }
}

int main() {
  int counter = 0;
  std::mutex m1, m2;  // 우리의 mutex 객체

  std::thread t1(worker1, std::ref(m1), std::ref(m2));
  std::thread t2(worker2, std::ref(m1), std::ref(m2));

  t1.join();
  t2.join();

  std::cout << "끝!" << std::endl;
}
왜냐하면 worker1이 lock1을, worker2 가 lock2를 먼저 가져가므로, 후순위의 lock을 가져갈 수 없는 상황이 발생하는 것이다.
worker 부분을 다음과 같이 바꿔주면 어떨까?
void worker1(std::mutex& m1, std::mutex& m2) {
  for (int i = 0; i < 10; i++) {
    m1.lock();
    m2.lock();
    std::cout << "Worker1 Hi! " << i << std::endl;

    m2.unlock();
    m1.unlock();
  }
}

void worker2(std::mutex& m1, std::mutex& m2) {
  for (int i = 0; i < 10; i++) {
    while (true) {
      m2.lock();

      // m1 이 이미 lock 되어 있다면 "야 차 빼" 를 수행하게 된다.
      if (!m1.try_lock()) {
        m2.unlock();
        continue;
      }

      std::cout << "Worker2 Hi! " << i << std::endl;
      m1.unlock();
      m2.unlock();
      break;
    }
  }
}
위의 코드는 worker2 가 worker1에게 작업을 양보하는 형태로 데드락을 해결했다. 하지만 이렇듯 한 쓰레드가 다른 쓰레드에 대해 우위를 갖게 되면, 우선순위가 낮은 쓰레드가 할 일이 없는 기아 상태(starvation)가 발생할 수 있다.
데드락 상황을 피하기 위한 가이드라인 (C++ Concurrency In Action)
중첩된 Lock을 사용하는 것을 피하라 (일반적으로는 1개의 Lock 만으로 충분하다)
Lock 을 소유하고 있을 때 유저 코드를 호출하는 것을 피해라
Lock 을 언제나 정해진 순서로 획득하라 (1->2, 1->2 는 좋지만 1->2, 2->1 는 곤란)
생산자(Producer) 와 소비자(Consumer) 패턴
웹 페이지를 긁어 오는 producer 함수와 읽어오는 consumer 함수가 있다고 하자.
긁어온 웹 데이터를 저장하거나 읽을 떄는 lock 을 소유해야 하는데, 상대적으로 읽는 작업이 웹 서버를 조회하는 것보다 빠르다.
따라서, 웹 페이지 내용을 저장할 때 lock 을 소유했다가 작업이 끝나면 consumer 함수를 깨우는 방식으로 코드를 짜면 된다.
잠들어 있는 쓰레드를 깨울 때는 조건 변수(condition_variable)을 이용한다.
#include <chrono>	// std::chrono::miliseconds
#include <condition_variable> // std::condition_variable
#include <iostream>
#include <mutex>
#include <queue>
#include <string>
#include <thread>
#include <vector>

void producer(std::queue<std::string>* downloaded_pages, std::mutex* m, int index, std::condition_variable* cv) {
	for (int i = 0; i < 5; ++i) {
		// Time required to download websites
		std::this_thread::sleep_for(std::chrono::milliseconds(100 * index));
		std::string content = "Website : " + std::to_string(i) + " from thread(" + std::to_string(index) + ")\n";

		// data should be inside the critical section
		m->lock();
		downloaded_pages->push(content);
		m->unlock();

		// notify consumer that the content is ready
		cv->notify_one();
	}
}

void consumer(std::queue<std::string>* downloaded_pages, std::mutex* m, int* num_processed, std::condition_variable* cv) {
	while (*num_processed < 25) {
		std::unique_lock<std::mutex> lk(*m);

		cv->wait(lk, [&] { return !downloaded_pages->empty() || *num_processed == 25; });

		if (*num_processed ==25) {
			lk.unlock();
			return;
		}

		// read front page and delete it from the queue
		std::string content = downloaded_pages->front();
		downloaded_pages->pop();

		(*num_processed)++;
		lk.unlock();

		std::cout << content;
		std::this_thread::sleep_for(std::chrono::milliseconds(80));
	}
}

int main() {

	std::queue<std::string> downloaded_pages;
	std::mutex m;
	std::condition_variable cv;

	std::vector<std::thread> producers;
	for (int i = 0; i < 5; ++i) {
		producers.push_back(
			std::thread(producer, &downloaded_pages, &m, i+1, &cv));
	}

	int num_processed = 0;
	std::vector<std::thread> consumers;
	for (int i = 0; i < 3; ++i) {
		consumers.push_back(
			std::thread(consumer, &downloaded_pages, &m, &num_processed, &cv));
	}

	for (int i = 0; i < 5; ++i) {
		producers[i].join();
	}

	// wake up all threads sleeping
	cv.notify_all();

	for (int i = 0; i < 3; ++i) {
		consumers[i].join();
	}

}
먼저 producer 함수부터 보자.
std::this_thread::sleep_for(std::chrono::milliseconds(100 * index));
위의 코드는 인자로 전달된 만큼 (여기서는 100ms) 만큼 함수를 sleep 시킨다. 즉, 여기서는 쓰레드가 5개이므로, 5개의쓰레드가 각각 0, 100, 200, 300, 400 (단위는 ms)만큼 잠들게 된다.
각각의 쓰레드는 content 를 읽은 후, 이를 downloaded_pages 라는 queue 에 넣는데, 이 때 mutex 를 lock 하고 unlock 하는 과정이 필요하다.
content 를 쓴 다음에는, cv->notify_one( ) 함수를 이용해 consumer 의 잠자고 있는 쓰레드들 중 하나를 깨우게 된다.
이제 consumer 함수를 보자.
std::unique_lock<std::mutex> lk(*m);

cv->wait(lk, [&]{ return !downloaded_pages->empty() || *num_processed == 25; });
if (*num_processed == 25) {
    lk.unlock();
    return;
}
먼저, unique_lock 을 이용해 뮤텍스를 스마트 포인터로 생성한다.
그 후, cv->wati 함수를 사용하는데, 첫 번째 인자는 unique_lock 객체가, 두번째는 wait 의 탈출조건이 들어가게 된다. 두번째의 조건이 true이면, cv->wait( )은 리턴을 하고 다음 줄이 실행이 된다. 만약 false 라면, 해당 쓰레드는 unlock 을 하며 sleep 하게 된다.
만약 sleep 한 상태에서 notify_one 함수를 통해 깨어나라는 이야기를 들으면, 다시 한번 cv->wait 의 두번째 조건을 확인하고, true 이면 lock 을 가진 상태로 쓰레드가 깨어나게 된다!
그 이후에는 작업 큐의 첫 요소를 제거하고, content 를 출력한 후, 80 milliseconds 를 잠든다. 80 밀리초는 content 를 읽는데 걸리는 시간을 대략적으로 추정하여 넣은 값이다.
마지막으로 main 함수를 보자. 사실 로직은 이전까지의 쓰레드 사용과 비슷하다.
cv.notify_all();
다만 위 문장이 추가가 되었는데, 이는 잠자고 있는 쓰레드의 경우 join 이 되지 않기 때문이다. 이를 방지하기 위해 자고 있는 쓰레드들을 전부 깨워 join 까지 해 주면, 모든 작업이 깔끔하게 마무리된다.
참고 : condition_variable의 다른 유용한 함수들 : wiat_for , wait_until
댓글